HubSpot CRM objects include contacts, companies, deals, tickets, and custom objects. In addition to showing object records, objects’ index pages have actions and filters that users can utilize to tailor HubSpot records.
FILTERING RECORDS AND SAVING VIEWS
- Navigate to records, and then to the object you wish to filter.
- “Contacts” => “Contacts,” “Companies,” “Calls,” or “Custom Objects”
- (Note: for accounts with multiple custom objects, hover over “Custom Objects” and select the object to be viewed.)
- “Sales” => “Deals” or “Payments”
- “Service” => “TIckets”
- Switch between objects while on an index page by engaging the “Objects” dropdown menu and selecting a different object.
- FIlter deals, tickets, and custom objects with pipelines.
- Choose table view to see records in a list, or board view to see records’ progression through their pipeline stages.
- Engage the “All pipelines” dropdown menu and then select a pipeline to see all records in a specified pipeline.
- Navigate to an object’s index page to see the object’s default view: a complete list of the objects’ records. (Note: Users can edit the default view.)
- Enter search terms into the search box to find specific records.
- Hover over a record and click “Preview” will display the record’s information.
- Click on the record name to display the full record.
- To see payments in the right panel, click on “payment amount” (gross amount column).
- To review a call recording, click on the call title and open the call reviewing tool.
Note: Users can review payment information but cannot edit payment properties.
- Select a saved view.
- To see a view that’s open, click the tab with the view’s name.
- To see a saved view that’s not open (not showing as a tab), click ”+Add view” to engage the dropdown menu, then choose your view.
- In board view, engage the current view dropdown menu and choose the desired view.
- Change the selected view’s filters by engaging the property dropdown menus.
- Filter by common default properties (Contact owner, Create date, Last activity date, Lead status) by engaging the desired property’s dropdown menu and select the desired filter criteria.
- Filter by other properties by clicking “More filters” and navigating to the right panel.
- Search for the desired properties.
- Choose the desired property criteria, and click “Apply filter.”
- Click “And” to select additional properties.
- Delete a property by moving your cursor to the filter and click “Delete.”
- Click the “X” in the upper right corner to complete the action.
- Remove filters from a view by clicking “Clear All” (above the table).
Save the current filters and settings by clicking “Save view,” then choosing one of the following options.
- Click “Save” to update the current view’s filters and settings.
- Click “Save as new view” to save the current view’s filters and settings as a new view – then assign the new view a name and visibility setting, and then click “Save.”
- Click “Reset” to cancel any changes you made.
- Export records in the current view by clicking “Actions/Board actions” to engage the dropdown menu and selecting “Export view.”
SELECTING HUBSPOT FILTER CRITERIA IN A VIEW
- Click “More filters” to display properties. Property type will dictate the available criteria options.
|
FILTER CRITERIA |
PROPERTIES APPLIED TO |
VALUE |
|---|---|---|
|
Contains exactly |
Any |
Text |
Note: Search terms that exceed one word and/or contain non-English characters require double quotes. Example: “Customer purchase history” Non-alphanumeric characters are treated as spaces. If your value is, North_American_client#” search results will include records that contain “North American clients.”
|
Doesn’t contain exactly |
Any |
Text |
|
Is |
Date |
Predetermined time frame options |
|
Is after |
Date Picker |
Calendar date |
|
Is any of |
Any |
Multiple text values |
|
Is before |
Date Picker |
Calendar date |
|
Is between |
Date Picker |
Two calendar dates |
|
Is equal to |
Any |
Text |
|
Is not equal to |
Any |
Text |
|
Is greater than |
Numerical |
Number |
|
Is greater than or equal to |
Numerical |
Number |
|
Is less than |
Numerical |
Number |
|
Is less than or equal to |
Numerical |
Number |
|
Is none of |
Any |
Multiple text values |
|
Is unknown |
Any |
Text |
|
Is known |
Any |
Text |
- Click “Apply filter” to save.
CUSTOMIZING THE APPEARANCE OF HUBSPOT PROPERTIES IN TABLE VIEW
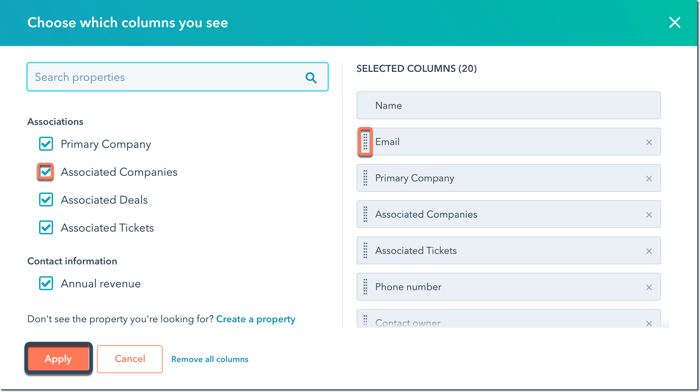
- Navigate to the table format area, engage the “Actions/Board Actions dropdown menu, and select the “Edit columns.”
- Select the properties you wish to view from the list on the left.
- Organize the selected columns on the right side
- Position/reorder columns by dragging the handle (left of the column name).
- Delete unwanted columns by clicking the “x.”
- Click “Apply.”
CUSTOMIZING THE APPEARANCE OF HUBSPOT PROPERTIES IN BOARD VIEW
- Navigate to the board format view and engage the “Board Actions” dropdown menu.
- Sort cards by selecting “Sort,” then selecting the sorting property and criteria.
- Edit pipeline stages by selecting “Edit stages.”
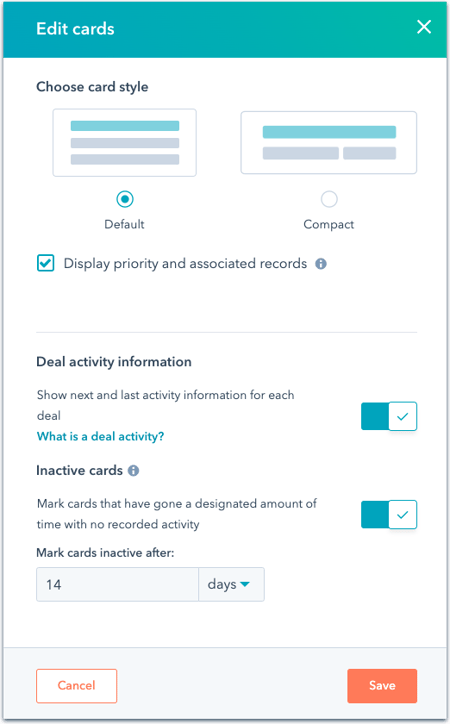
- Customize the cards by selecting “Edit cards.”
- Navigate to the right panel and select the card style that displays the information amount you want - “Default” or “Compact.”
- Elect to see or hide icons by clicking on the associated checkboxes.
- For open deals & tickets with active cards, users can click on the “Deal or TIcket activity information” switch to display the most recent and soonest upcoming activity information (calls, chats, meetings, notes, tasks, tracked 1-to-1 emails).
- To mark a deal or ticket initiative, click the “Inactive cards” switch and set the desired options. (Note: Inactive cards will always display the most recent activity.)
- Click “Save.”
MANAGING SAVED HUBSPOT VIEWS
- Customization options for HubSpot views include the following.
- Selecting which views are displayed on object index pages.
- Creating new views
- Setting each object’s default view
- Designating users with view access
- Deleting views
- Navigate to records, and then to the object you wish to filter.
- “Contacts” => “Contacts,” “Companies,” “Calls,” or “Custom Objects”
(Note: for accounts with multiple custom objects, hover over “Custom Objects” and select the object to be viewed.) - “Sales” => “Deals” or “Payments”
- “Service” => “TIckets”
- “Contacts” => “Contacts,” “Companies,” “Calls,” or “Custom Objects”
- Create a new view by clicking “+ Add view, and then clicking “+Create new view.”
- Open an existing view by clicking “+ Add view” and choosing a view from the dropdown menu. (Note: Opened tabs stay pinned to the index page until you lose them.)
- Reorder views by clicking and dragging a view’s tab. (Note: the view in the left-most position becomes the first view displayed when you visit the index page.)
- Close views by clicking on the view tab’s “X.”
- Reopen views by engaging the “Add view” dropdown menu or navigating to “All [object] saved views.
- Display all saved views by clicking “All views.”
- Open a view as a tab on the index page by clicking on its name.Click a view name to open it as a tab on the index page.
- Edit or delete a view by hovering over its name, clicking “Options,” and then choosing the desired action.
- Create report (Professional and Enterprise only)...use report builder to build a report using the view’s data.
(Note: Users may not use data in a calls view or payments view.) - Clone (create a new view with the same filters)…type the cloned view’s name in the dialog box, then click “Save.”
- Delete…click Delete to confirm. (Note: deleting HubSpot views will not delete the records included in the view.)
- Export
- Manage sharing…click to make the view private, accessible to your team, or accessible to all account users. Confirm changes by clicking ‘Save.”
- Rename…type the new name into the dialog box, then click “Save.”
- Create report (Professional and Enterprise only)...use report builder to build a report using the view’s data.