The HubSpot left (properties) sidebar gives users a handy view of the record’s default About section and the most relevant additional sections and properties. Users with “Account” and “Edit property settings” permissions can select and organize up to 300 properties for addition to the “About” section. HubSpot Professional and Enterprise account users can add up to 50 properties in additional custom sections. The default sections are what all users see. Individual users can enhance their “About” section by adding properties to their default view.
Customizing an object’s default properties sidebar ensures that all users in a given account will see the same baseline left sidebar properties for that object.
- On the main navigation bar, click the settings icon <INSERT IMAGE OF ICON?>.
- Navigate to the left sidebar menu, click “Objects,” then select the object for which you want to modify the sidebar.
- Click “Record Customization,” then click “Customize the left sidebar.” The right panel will display current sidebar properties.
- Click “Edit,” and then select the section you wish to edit from the right side panel.
- To rearrange properties, click and drag the property handle.
- To delete a property, click the “X” at the end of the property. (Note: Deleting a property from the default About section” will not remove the property from individual users’ customized views.)
- To add properties, search the left side panel for the desired property and click the corresponding checkbox(es).
- To create a new property, open the dropdown menu and click “Create property.” Users can tailor the new property in the right side panel.

- Click “Save.”
ADDING, EDITING, AND REMOVING CUSTOM RECORD SIDEBAR SECTIONS
Adding, editing, removing, and rearranging sections in record sidebars is limited to HubSpot Professional and Enterprise users. Sidebars are limited to 30 sections. For HubSpot mobile app users, only Android operating systems will display “About” and custom sections. HubSpot iOS mobile app users will only see the customized About section.
- Navigate to the “Record Customization” tab, and click on a team sidebar name or on “Customize the left sidebar.”
- Add a new section.
- Navigate to the right panel and click “Add section.”
- Navigate to the right panel and enter the new section’s name.
- Add a section that already exists.
- Click on the “Saved sections” tab.
- Click the checkbox next to the name.
- To modify the name or other properties of the section, navigate to the “Section editor” tab. (Note: Users cannot modify the name of the About section.)
- Remove a section. (Note: About section cannot be deleted.)
- Navigate to the right panel and click on the section to be removed.
- Click the “X.”
- Reorder sections by clicking and dragging the section handle.
- Save changes by clicking “Save.”
DESIGNATING A RECORD SIDEBAR AS CONDITIONAL (HUBSPOT ENTERPRISE USERS ONLY)
Conditional sections help users see only the most relevant information by making sections visible only when a record has a specified value (term) for a property. Users can make sections conditional while adding or editing a section.
- Navigate to the “Record Customization” tab, and click on the name of a team sidebar or the “Customize the left sidebar.”
- Click on the desired section and then click on the checkbox next to “Make this section conditional.”
- Engage the Property dropdown menu by clicking on the triangle at the far right of the first listed property, then scroll through the list and select the property that will determine if the section is displayed.
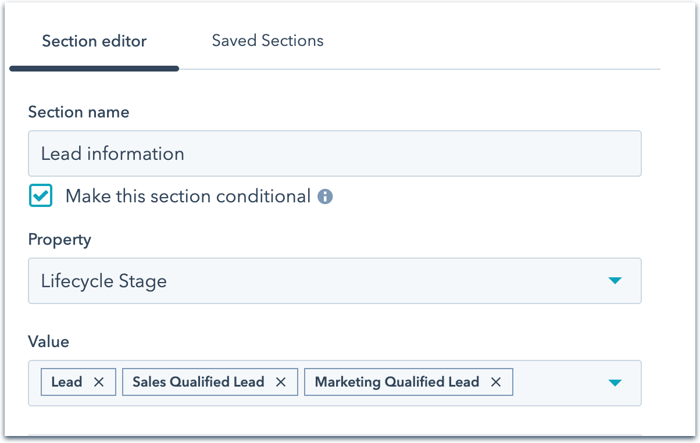
(Note: When creating conditional sections, users must utilize select type properties with preset options: checkbox, radio select, or dropdown select properties.)
- Click “Save.”
CREATING AND EDITING TEAM-SPECIFIC DEFAULT RECORD SIDEBARS IN HUBSPOT (HUBSPOT ENTERPRISE USERS ONLY)
- Navigate to the main navigation bar and click the settings icon <INSERT IMAGE OF ICON?>.
- Navigate to the left sidebar, click on “Objects,” and then click on the object for which you’d like to create a team-specific sidebar.
- Navigate to the “Record Customization” tab to create a new sidebar or to view, edit, or delete an existing team sidebar.
- New sidebar creation
- Click “Create sidebar.”
- Create a name for the sidebar by clicking on “name” or the pencil icon.
- Select the team(s) that will see the sidebar by clicking on the dropdown menu.
- Click “Save,” then click “Publish” to replace the default sidebar with the custom record sidebar for the selected team(s).
- Current sidebar review, edit, or deletion
- Hover over the sidebar you wish to work on.
- Click the “Actions” dropdown menu to select the action you wish to execute.
- View…Review current section properties in the right panel.
- Edit…Change section properties, then click “Edit” to confirm changes, then click “Save,” then click “Publish.”
- Delete…Eliminate the sidebar.