Payment links enhance a buyer’s experience by making the payment process flexible and simple. HubSpot payment links also enhance your business by streamlining payment acceptance, enabling recurring payments, and creating options for providing the links to your buyers. Additionally, data from automated payments provides your team with valuable information related to buyers’ purchasing and payment activity.
Users can add HubSpot payment links to marketing emails or incorporate payment links into their websites. Website addition options include a default payments module added to a drag-and-drop page or template or a payment link embed code added to external website pages. Website builders/developers can incorporate payment links by adding a payment field to your site’s theme or custom module or building a custom payment module.
ADDING A DEFAULT PAYMENTS MODULE TO YOUR HUBSPOT CONTENT
Payment links added by this method will appear as a checkout button that customers can click to enter their payment details.
- Navigate to “Marketing,” then to the content to which you wish to add a payment link.
- Marketing => Website => Website Pages
- Marketing => Landing Pages
- Marketing => Website => Blog
- Hover your cursor over the page or post you’re adding the link to and click “Edit.”
- Navigate to the content editor, then the “Add” tab, then the “Common modules” area.
- Click and drag the “Payments module” to where you want it on the page.
- Navigate to the sidebar editor and engage the “Payment” dropdown menu.
- Select the payment link you wish to add.
- Navigate to the “Checkout behavior” area and select how/where customers will enter their payment information.
- “Open in new tab” will take customers to a new browser tab.
- “Sliding overlay” will display the payment information entry page as an overlay.
- Navigate to the “Button text” field to specify the text that will appear on the payment link button.
- Click “Add icon” to select an icon to appear on the button as well.
- Click “Update” or “Publish” to implement changes.

Users can add the default payments module to the page template using the design manager.
ADDING THE HUBSPOT PAYMENT LINK EMBED CODE TO A CUSTOM PAYMENT MODULE OR EXTERNAL WEBSITE
Embedding payment links creates checkout forms that appear on the webpage.
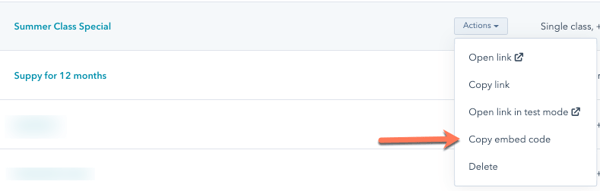
- Navigate to “Sales,” then to “Payments,” then click “Manage payment links.”
- Hover over the link to engage the “Actions” dropdown menu.
- Select “Copy embed code.”
Users can add the embed code to an external website. Website developers can use the HubSpot design manager to create a dynamic module or build a new module for each new link. (Note: HubSpot recommends enlisting a designer/developer with knowledge of HTML, CSS, HubL, and the HubSpot design manager to develop modules.)
Embedded payment links will NOT generate an on-screen order summary or checkout description. These are available by sharing the payment link with the buyer.
ADDING HUBSPOT PAYMENT LINKS TO MARKETING EMAILS
Embedding payment links in marketing materials creates opportunities for customers to purchase items described in the email.
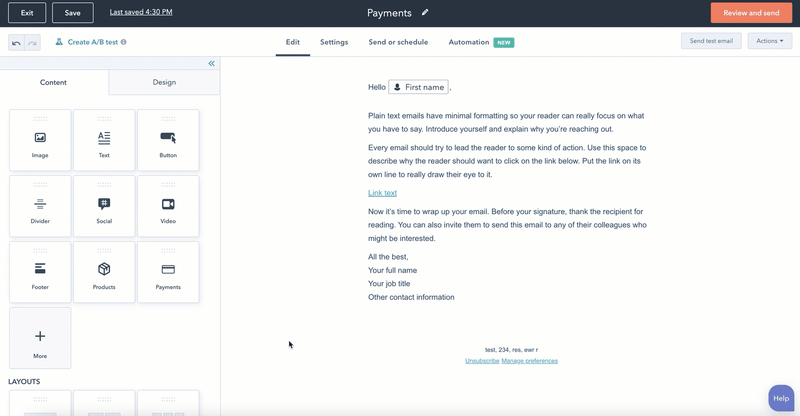
- Navigate to “Marketing,” then to “Email.”
- Click “Create email,” or hover over a previously created draft and click “Edit.”
- Navigate to the “Content” tab (left panel) and click and drag the “Payment” module into your email.
- Engage the “Payments” dropdown menu and select a payment link.
- Navigate to the “Button text” field to specify the text that will appear on the payment link button.
- Click the emoji icon <insert emoji icon?> to add emojis to the button.
- Customize the button color, size, and text font using the styling tools.
- Finish and send your email.
Customers clicking the button will be directed to the checkout page.