HubSpot for Manufacturers

A Step-By-Step Guide to Setting Up a Successful Marketing Strategy

Setting Up a Successful Marketing Strategy

Whether you’re a new HubSpot user or just kicking the tires, you’ve come to the right place. This page was created to help you successfully navigate the ins-and-outs of a powerful platform for manufacturing marketing.

It’s also designed to help you understand how HubSpot’s individual hubs and tools work together to support your marketing workflows and your buyers’ journey. In addition, we’ve done the heavy lifting of sifting through dozens of Knowledge Base articles and other resources to help you deepen your understanding and use of HubSpot in a logical and integrated manner.

How to use and navigate this resource.

  • Skim through it — scroll through this information to get a feel of the breadth and depth of what an investment in HubSpot can mean to your manufacturing business.
  • Instruction manual approach — read it from top to bottom before setting up and using your website in HubSpot. This will give you a comprehensive view of everything, from beginning to end, that you’ll want to know and do with Hubspot.
  • Take a deep dive — pick a topic from the table of contents below, click and jump to that section to perform the marketing, sales, or service related functions.

TABLE OF CONTENTS

Manufacturing Marketing Strategy With HubSpot

Creating a Manufacturing Website Using HubSpot is Easier Than You Think

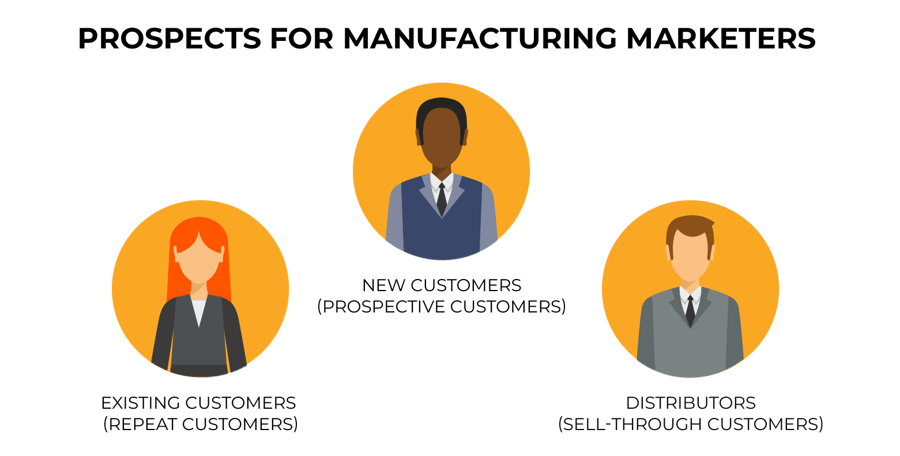
There are three buckets of prospects manufacturing marketers seek to engage: new customers (prospective customers), existing customers (repeat customers), and distributors (sell-through customers). For the sake of this discussion, we’ll refer to them all as prospects. They are prospects because they all hold the potential for additional revenue.

prospects for manufacturing marketers-2

Sales revenue from these prospects occurs by attracting, converting, closing, and delighting them with messaging, content, and calls-to-action across each stage of the buyer’s journey. But for this to occur, not just any old website will do. Marketers must have a robust platform and a dynamic system of integrated tools to achieve success in manufacturing marketing.

A website built in HubSpot provides a place where manufacturing prospects can get the information they seek to meet their needs. It’s a place where manufacturers can unleash the full force of their digital marketing strategy.

HubSpot, in a nutshell, is a CRM platform for your entire business. It includes a series of integrated hubs for marketing, sales, and customer service interactions, plus a powerful CMS to give users a personalized and secure experience.

As prospects discover the content that interests them, you will then enable more conversions and, ultimately, secure more sales..

How easy is it to set up a website for manufacturing marketing in HubSpot?

It can be done in just seven steps with an easy-to-use creation tool that will walk you through the process click-by-click.

Build a website in HubSpot in 7 easy steps:

  1. Create your home page.
  2. Select a design template.
  3. Edit the content modules for your page.
  4. Create other pages for your website.
  5. Add social media accounts.
  6. Install the tracking code to view analytics.
  7. Create, publish, and monitor blog posts.

Manufacturing marketers may already have a handle on creating pages for their website (see step 4 above). Most likely, there are already pages making up your existing, static website. Building out the HubSpot website provides an excellent opportunity to create a new site map and page navigation according to the buyer journey — HubSpot again makes it easy to do this.

Next up: how HubSpot makes website changes easy with its drag and drop editor.

Learn more >>

Drag and Drop Editor Makes Website Changes Easy

It’s easy to set up a website in HubSpot. It’s also a snap to create and make changes to its content. But that’s not all; HubSpot’s drag and drop editor is a powerful tool that enables you to perform several actions — without any need to hire a developer or write any code.

Drag and drop editing features provide the ability to quickly

  • create or rearrange your page layout.
  • apply custom background styles.
  • add modules for adding and editing content.

Drag and drop editing is a versatile feature. It’s available for the HubSpot starter template, theme template, or a coded template with a drag and drop area.

Modules are at the heart of the drag and drop editor. There are a total of eleven common modules currently available. Here’s a brief overview of some key modules and their functions (click here for a full list of common modules):

  • Header — use it to add a label to your page that users and search engines will use to understand your page’s structure and content.
  • Image — add an image you’ve uploaded to the files manager.
  • Form — add any existing form in your HubSpot account or build and customize a new form on your page.
  • Image Gallery — create a carousel of product images by adding them to an image gallery along with descriptions and links right within the page editor.
  • Call-to-Action — attract and engage visitors by sending them to a new page of content or a special offer.
  • Rich text — these are multipurpose containers used for adding text, links, images, bullets, headings, and more. Learn more about rich text modules.

hubpost-drag-and-drop-editor-example

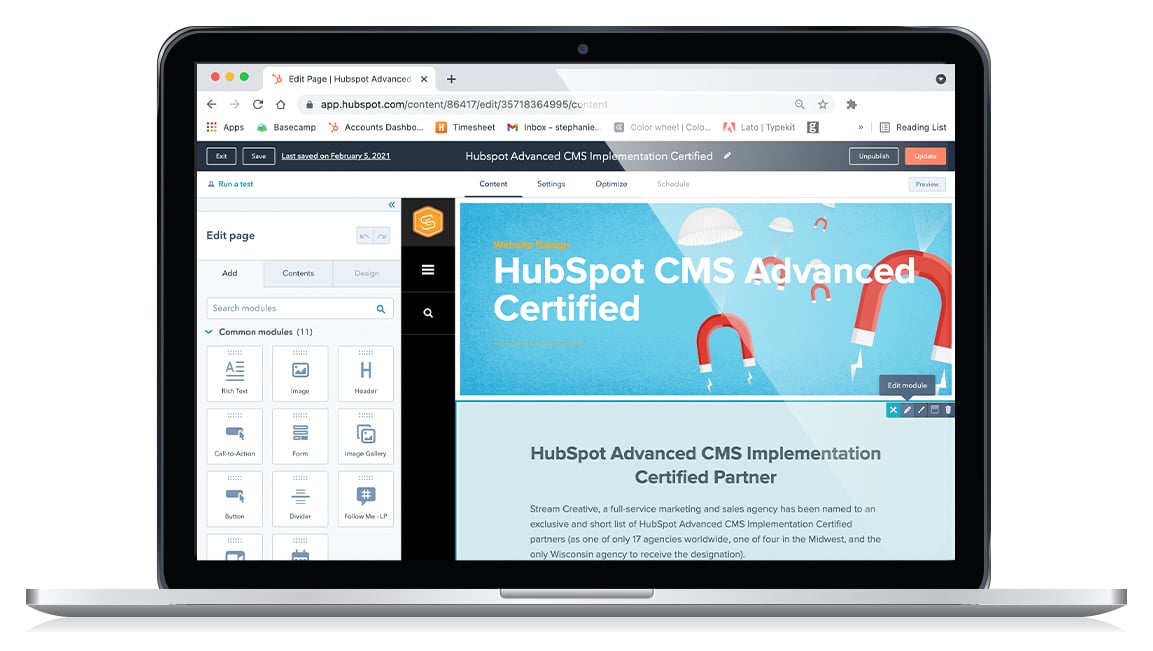
As you can see, it’s not difficult to insert a module into a page area. Left-click on the module you want from the menu on the left, then drag it to the location on the page where you want it to appear.

You can also add multiple modules to a page area. For example, to create a compelling marketing message and offer, add a header, rich text, and call-to-action module to your page.

Create Contact Lists

Every marketing strategy involves sharing meaningful information and opportunities to deepen relationships with prospective customers. HubSpot provides the tools for creating and sending newsletters, email marketing communications, customer satisfaction surveys, and more.

Marketers can also take advantage of the workflows tool to automate email marketing and lead nurturing campaigns based on the contact’s qualifying factors and the business’s list segmentation practice. For example, with workflows, manufacturing marketers can notify and assign qualified leads to its sales team when a defined criterion is met in a contact’s property field.

Please note, depending upon the HubSpot subscription, users can automate their marketing, sales, and service processes by setting up workflows in their portal. Learn more about HubSpot’s product offerings.

Active and Static Lists

Contact lists can be easily created and segmented within your HubSpot portal. There are two types of lists: active lists and static lists. The contacts or members of an active list are updated automatically based on how each contact engages with your content and offers. Static lists never change; contacts are added based on set criteria, such as attendance at a tradeshow.

Contact-based and company-based contact listContact-based and company-based contact list

Lists can also be set up as either contact-based or company-based. The information stored within these lists is referred to as properties, some of which will be automatically populated in HubSpot based on the contact’s interactions.

Dozens of default properties can populate for contacts or companies. Marketers also can create custom contact properties to meet their unique business needs.

Examples of the default properties which can be captured are as follows:

Use segmented lists to move leads down the funnel

Information captured and populated in the default or custom property fields will lend itself to further segmentation and follow-up. For example, leads who visit a case study page may be nearing a purchase decision. Segment these leads into a lead nurturing workflow designed to address their bottom-of-the-funnel interests.

We are just scratching the surface on using contact lists and how properties, segmentation, and prospect interactions can help drive responses for marketing, sales, and customer service. To help you get started with contact lists, visit the following resources:

Easily Segment Target Personas

Contacts can be segmented according to the data collected from their interactions. You can also segment contacts based on the buyer personas you create in HubSpot. Separating contacts into different persona groups allows you to be more targeted with the information you send them because it will align with their interests and needs more closely.

Use persona-based segmentation to increase clickthrough rates

Sending targeted content to the right people at the right time has the potential to pay big dividends. A HubSpot study found that persona-based segmentation increases email clickthrough rates by 16%.

There are many elements manufacturers can design their buyer persona profiles around. At a high level, you could have persona profiles based on industry.

Speak your personas’ language

Let’s say your business specializes in manufacturing plastic components for the automotive, medical, and construction industries. While there may be similarities in the technologies and processes involved in molding parts for all three, they undoubtedly have different goals and requirements. Segmenting your messaging to each of their specific needs, goals, and pain points will make them feel like you’re “speaking their language.”

And when marketers speak their buyers’ language, they’re much more likely to get engaged and click on offers related to their specific needs.

With some strategic planning and a little work, manufacturers can set up unique templates with automated workflows to nurture and support their buyer personas.

Here are some resources to help get you started with persona-based segmentation:

Personalization

Developing and segmenting target buyer personas in HubSpot will drive more engagement and conversions for manufacturing marketing. But don’t stop there. Increase engagement rates even more by personalizing your content with HubSpot’s personalization tokens.

Benefits of personalized marketing

Personalization is a marketing strategy to create unique opportunities that enhance users’ experience with your website and email content. It can lead to increased time on your site, closer attention paid, and higher conversion rates.

Here are some data points from multiple studies of personalization as reported by HubSpot:
99% of marketers surveyed said personalization helps advance customer relationships, with 78% claiming it has a strong or extremely strong impact.
78% of marketers say email is the most personalized channel, followed by websites.
More than 20% of marketers say personalization can improve email engagement.

How to easily add personalization with HubSpot

We spoke earlier about property values in contact-based and company-based lists. Remember, some of these are added manually, while some are automatically populated based upon a prospect’s interactions with you online. These property values provide the basis and opportunity for personalization. HubSpot’s personalization tokens represent the property values for your CRM’s contacts and companies.

As this knowledge base article details, personalized tokens for any of the supported property values can be added in the rich text modules associated with website pages, landing pages, and the email editor.

Here’s how to add a personalization token in HubSpot:

  1. Navigate to your email, landing page, or website page.
  2. Hover over the name of the content you’re editing and click Edit.
  3. Click a rich text module to insert a personalization token.
  4. Place your cursor where you want to insert a personalization token.
  5. Click the Personalize dropdown menu in the rich text toolbar.
  6. Click the Token dropdown menu and use the search bar to select a Token (for Company, Contact, Office Location, or Subscription Type properties).
  7. Select a property from the dropdown menu to use as your token.
  8. Set a default value for the token (to be used when the contact doesn’t have a value for the property chosen).
  9. Click to insert the token.

how-to-add-a-personalization-token-in-HubSpot-1

Now, when your contact receives the email or visits your page, they will see the property value you’ve chosen be presented right in front of their eyes! And, while personalization tokens provide a deeper level of engagement with your targeted contacts, personalizing content with HubSpot doesn’t end there.

Enterprise users with the HubSpot Marketing Hub Professional and CMS Hub Proversional product versions can further personalize content with the smart content feature. Smart content allows you to supply different versions of your emails, website pages, or landing pages based on specific viewer criteria, set up with smart rules.

Smart rules apply to the following criteria types:

  • Country
  • Device type
  • Referral source
  • Preferred language
  • Contact list membership
  • Lifecycle stage

Learn and do more with smart content:

Content Marketing for Manufacturers

content-topic-clusters-exampleHubSpot includes the tools manufacturers need for supporting their content marketing strategy. These include everything from SEO to content creation, driving traffic, lead generation campaigns, and the capability to monitor and improve results.

This section will cover how manufacturers can leverage HubSpot for SEO, organic traffic, lead generation, and email automation campaigns.

HubSpot Improves SEO for Marketing Manufacturing Websites

Applying sound SEO practices will, over time, bring more targeted organic traffic to your website pages. HubSpot takes the guesswork and drudgery out of performing the vital SEO tasks needed in today’s highly-competitive manufacturing marketplace.

Your first step is to create relevant topics that represent your manufacturing expertise. These topics will then serve to help search engines understand what your website is all about. They will also form your content marketing strategy foundation, which we’ll talk about a little later in this section.

What’s the difference between topics and keywords?

“Keyword research tells you what topics people care about...The operative term here is topics — by researching keywords that are getting a high volume of searches per month, you can identify and sort your content into topics that you want to create content on. Then, you can use these topics to dictate which keywords you look for and target.” Source: How to do Keyword Research for SEO

Here’s how to create topics for your SEO strategy in HubSpot:

  • Go to Marketing > Planning and Strategy > SEO.
  • Click the Topics tab.
  • Click Research Topics
  • Enter the topic (phrase) you want to be found for in the box and click Done.

Once you have your first topic entered, you’ll be able to view its monthly search volume and difficulty score. HubSpot will also generate recommended topics for you to consider.

Learn more about creating and analyzing topics.

SEO strategy in HubSpotHubSpot’s easy-to-use SEO Tool will also help you optimize your page and blog content for search engines by giving you recommendations for page titles and meta descriptions.

To view SEO recommendations and optimize your website pages:

  • Go to Marketing > Planning and Strategy > SEO.
  • Click the domain for which you want to view recommendations.
  • Click View recommendations (top recommendations are listed first).
  • View all SEO recommendations in the left sidebar menu (grouped by category and priority order).
  • Click View pages to see which pages need to be optimized.
    • Click Fix in editor to fix a HubSpot-hosted page or blog post.
    • Click the page URL to fix a page hosted outside of HubSpot.
  • Hide any recommendations that don’t apply to your website:
    • Click Hide as you hover over a specific page.
    • Submit your reason for hiding the recommendation.
    • Click Show all hidden recommendations to unhide page recommendations.

Create topic-based content clusters

Due largely to Google’s algorithm changes, SEO is an ever-evolving art form. Agile tools like those engineered in HubSpot help marketers align their SEO and content marketing strategy to take advantage of the latest methods for getting found at the top of search results.

The next evolution of SEO is to create and arrange content around topic clusters. Visualize a hub and spoke model where the hub is a core piece of content with multiple extensions of related content connected to the hub with hyperlinks. A topic-based content cluster can be defined as follows:

  • Hub content: a core page of pillar content covering a topic broadly
  • Cluster content: individual blog articles narrowly covering highly-related subtopics

You may have as many as 20-30 cluster pages hyperlinked on one pillar page of content. These subtopic blog articles can be added over time. Don’t wait to build your pillar page until you have all of them up and running. You can start with just a handful. And if you’ve already created a fair number of blog articles, conduct a content audit to see which ones could serve as a subtopic to your pillar page.

We signaled the impact pillar pages could have on search engines in a post about emerging trends as far back as 2018: “High-performing pillar pages will allow you to gain authority with a number of quality inbound links from your subtopic content.”

As you can see from our earlier discussion, HubSpot’s SEO Tool is geared toward helping you in creating topic-based content clusters. Not only that, but you’ll be able to track, monitor, and improve results easily.

50+ Content Ideas

Learn more links:

Lastly, to achieve success with implementing your content marketing strategy, you’ll want to take advantage of customizing your dashboard in your HubSpot portal. The reports added to your dashboard will enable you to monitor topics (keyword clusters) and page performance easily.

Here’s how to add reports to create your custom dashboard in HubSpot:

  • Navigate to Reports > Dashboard
  • Click Add Report to access the report library
  • Search and find the report you want to add

Increase Organic Traffic for Manufacturing Services

Of the three types of digital media (paid, owned, and earned), owned is largely attributed to organic traffic. Owned media has to do with the digital properties you own and control. Such as your website, blog, landing pages, and social media channels.

Whereas traffic from paid media will slow or stop as soon as you stop paying for it, organic traffic from owned media will continue to provide ever-increasing visibility. It’s also long-term, relatively low-cost, and extremely targeted.

The linear journey of having you set your HubSpot website up until now has been intentional to prepare you for generating increased amounts of organic traffic for the manufacturing services you provide.

Let’s do a quick recap:

  • Set up a HubSpot website for manufacturing marketing in 7 easy steps
  • Use the drag and drop editor
  • Create contact lists and segment by target personas
  • Add personalization and smart content
  • Use of the SEO Tool for improving visibility and creating content clusters

These elements provide the framework for creating content on website pages, blogs, pillar pages, and content clusters to help support organic traffic growth.

Once targeted organic traffic is achieved, you’ll be able to easily add calls-to-action (CTAs) that link to offer pages (landing pages) to generate leads and move them through the buyer journey.

What is a CTA?

A CTA is a compelling button, image, or plain text link used to direct visitors to a landing page or opt-in form to deliver something of value and convert them into a lead.

How to add CTAs in HubSpot

Here’s how easy it is to add a CTA to a piece of content in HubSpot:

  • Go to your blog, email, landing pages, or website pages dashboard.
  • Hover over the piece of content you want to insert the CTA and click Edit.
  • Find the rich text module in the content editor and place your cursor where you want to place the CTA.
  • Select Call-to-Action from the Insert dropdown menu in the upper right.
  • Select the CTA to insert from the right panel, then click Insert.
  • To edit its styling, click the CTA in the rich text editor.

How-to-add-CTAs-in-HubSpot

> Learn more about adding CTAs to email and a HubSpot content template

Use HubSpot for Manufacturing Lead Generation

With HubSpot, you’ll be able to generate leads using all of the lead generation campaign tools right within your portal. And, once leads are generated, you’ll be able to easily track responses and set up automated emails to nurture your leads through the sales funnel.

A fully-functioning lead generation campaign consists of the following components:

  • Compelling content and offers your target personas will love
    • Website pages, pillar content, cluster content (blogs)
    • Lead magnets (a valuable piece of content that elicits an exchange of the visitor’s contact information and email address for the downloadable resource)
  • CTAs that direct visitor to an offer or landing page
  • Landing pages with forms to capture the visitor’s contact information, especially their email address
  • Thank you page and/or email to deliver the lead magnet or free download
  • Automated emails to deliver added-value content that nurtures the lead

Pro tip: Every web page and blog post has the potential to generate leads by adding CTAs in the content. Just be sure the offer is a contextual match with the content where the CTA is placed.

How many CTAs should you add to a single piece of content?

Consider adding multiple CTAs throughout a piece of content. A good rule of thumb is to have a CTA towards the top, middle, and bottom. This is because visitors will likely scroll from top to bottom, skimming to find the content most interesting and relevant to their initial search. Also, insert CTAs in multiple forms throughout the page: button, image, text.

With HubSpot, you’ll be able to track and test which CTAs received the highest click-through-rates.

Not that you’ve got your content marketing machine in HubSpot built and operational, you’ll next want to set up automated workflows to nurture and convert leads into paying customers.

Email Marketing Strategy

Email Marketing StrategyEmail is a proven marketing strategy to generate subscribers to your blog, keep prospects informed and engaged, and nurture leads into becoming customers.

HubSpot has all of these email marketing bases covered for achieving your manufacturing marketing strategy. This section will primarily focus on setting up email automation for lead nurturing purposes. We’ll also touch on creating email templates for newsletter and blog subscribers.

Leverage Email Automation to Nurture Leads

Emails in HubSpot can be automated based on user actions or ticket status for service representatives. HubSpot provides the choice of two types of editors for creating automated emails: regular and drag-and-drop. Here’s how easy it is to set up each of them with just a few clicks.

Regular Editor

  1. Go to Marketing > Email in your HubSpot portal.
  2. Click Create email in the upper right.
  3. Choose the Automated type in the dialog box.
    <show screenshot of Regular, Automated, Blog/RSS dialog box>
  4. Choose a template
  5. Enter a name for the email workflow and click Create email.
  6. Compose the email, then click the Recipients tab.
  7. Make sure that Save for automation is selected under Select recipients.
  8. Click Next to review your email settings.
  9. Click Save for automation.

Your automated email will now be published, and you’ll be able to select the automated email in the Send an email action in workflows.

Drag and Drop Editor

  1. Perform steps 1-3 as you would for the Regular Editor listed above.
  2. Click the Drag and drop tab and choose a template.
  3. Compose the email, then click the Send tab.
  4. Click Review and save, then Save for automation.

Your automated email will now be published, and you’ll be able to select the automated email in the Send an email action in workflows.

You can also create automated emails in the workflow editor in just 8 steps:

  1. Go to Automation > Workflows in your HubSpot portal.
  2. Click the name of an existing workflow, or click to create a new one.
  3. Click the plus (+) icon to add a workflow action
  4. Click the Send email action in the right panel.
  5. Select + Create new email.
  6. Enter the details of your email in the right panel.
  7. You can customize the email further by clicking the email tool link at the top of the panel.
  8. After you’ve created your email, click Save email.

You can now select it for use in any workflow. The email will also be available from your email dashboard should you wish to edit it further.

Easily Create Email Templates and Newsletters

hubspot-email-template

With HubSpot, you have options for templates to use with automated emails, newsletters, blogs, and more. Customizing a template with your logo and color palette gives your message a consistent look and feel with your website's design characteristics. Your stylized templates will help create consistent awareness of your manufacturing company brand.

Template options in HubSpot
You can create email and blog templates in HubSpot’s layout editor. Those skilled in web design and development can build a custom-coded template in HTML & HUBL. Free and for-purchase ready-made templates are available in the Asset Marketplace.

Benefits of using a custom template in HubSpot

The templates you build or add will be available in the regular or drag and drop editor when you go to create an email. Consider the following benefits to creating custom HubSpot email templates:

  • A professional-looking template builds trust with recipients.
  • Custom-designed templates with good usability are more likely to get read.
  • A well-constructed template will save you time by allowing you to copy and paste content right into the email easily.
  • You can use the same template multiple times, which in turn builds trust and brand recognition.
  • They will help you deliver a personalized, high-quality experience with every email sent.

Resources to help you get started with custom templates:

Sales Enablement and CRM Support for Manufacturers

Hubspot CRM for Manufacturing Services
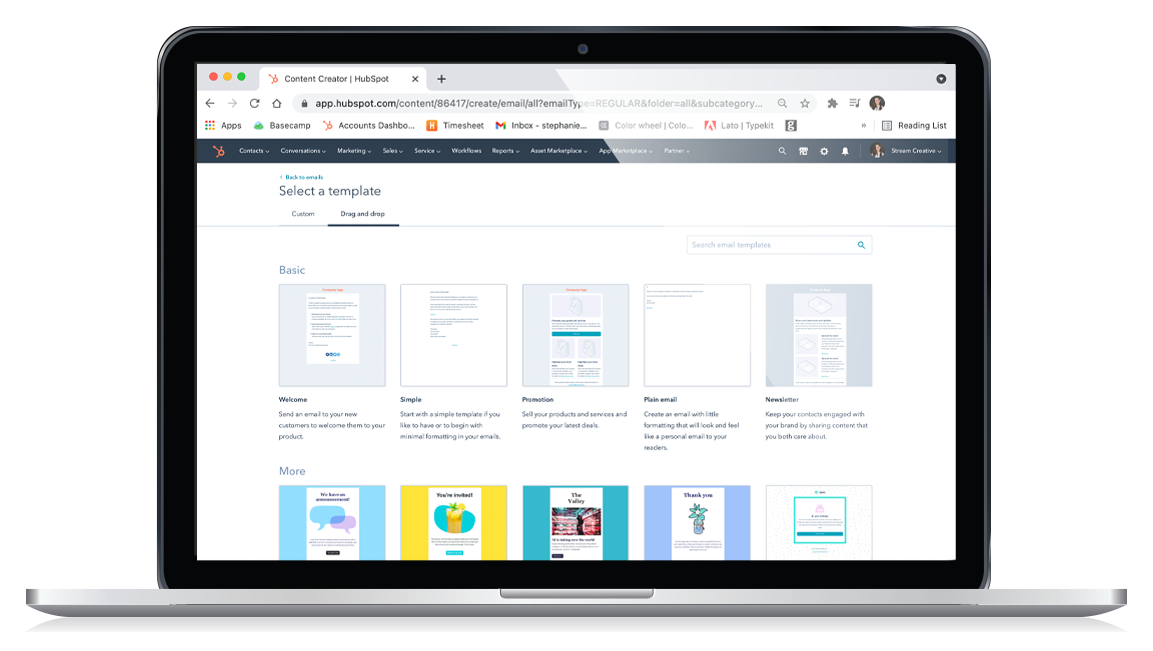
The Benefits of Using Hubspot CRM for Manufacturing Services

It's one thing to collect data on your customers; it's an entirely different matter to have the ability to collect it in one place and then put it to effective use. HubSpot's free CRM is a powerful suite of tools that gives your manufacturing business one-stop access to all of the information and functions you'd expect from a full-featured CRM.

Take advantage of your HubSpot’s CRM capabilities.
There are over 20 free CRM features alone in your HubSpot account. Here are a few highlights to stimulate your thinking on using them.

  • Contact management and segmentation — Keep track of your contacts, what your relationship is with them, and the deals you’re working on. Know at a glance where certain contacts are in your sales funnel. Run automated actions to manage your contacts and data easily.
  • Lead scoring — Use your CRM’s lead scoring capabilities to indicate where your prospects may be in their buying journey based on a series of behaviors. Then separate your marketing qualified leads (MQL) into a designated MQL list.
  • Trigger emails — Integrate your Outlook or Gmail to your HubSpot CRM to send emails when certain events or criteria are met. You can also set up a shared team email account and access dozens of other useful, time-saving tools.

How to Use the CRM for Custom Sales Email Videos

If a picture is worth a thousand words, personalized videos are pictures on steroids. It makes your message more captivating, more human, more memorable, and fun for your prospects.

91% of consumers are more likely to shop with brands who recognize, remember, and provide relevant offers and recommendations. Source, Accenture

And, with the Vidyard integration for HubSpot, you'll be able to track individual viewer data having to do with who's watching your videos and for how long. You'll then be able to use this viewer engagement information to automate your marketing by segmenting, scoring, and nurturing leads right from within HubSpot.

The possibilities for adding videos while integrating engagements and follow on interactions with the CRM are endless. As this HubSpot knowledge base article outlines, CRM videos can be added to the following:

  • Chat conversations — insert a video into a chat conversation from the Conversations > Inbox to demonstrate how to do something with one of your products.
  • Bot actions — add videos to the following bot actions: Send a simple message that doesn’t require a response such as, “Hope you have a great day!”; Ask a question and populate the specific contact properties field with the answer; Offer email subscription to obtain the contact’s consent to communicate with them.
  • One-to-one emails, templates, and sequence emails — For customers with Sales Hub or Service Hub Professional and Enterprise only.
  • Record or add existing videos — Create and offer personalized video recordings with the Vidyard Go Video application.

Social Media Marketing Strategy

manufacturing-social-media-strategyA robust social media marketing strategy can increase targeted traffic, drive engagement, and support SEO. HubSpot's social tool was designed with these benefits in mind. This section will help you get started using the tool in a practical, step-by-step manner.

Why Use Hubspot for Social Media?

Simplify your social media marketing strategy with HubSpot's social tool. Once your social channels are connected in HubSpot, you'll be able to perform the following:

  • Create and publish social media posts
  • Track and monitor all your social streams
  • Set up a custom social publishing schedule

Connect your social channels to HubSpot.

  • Click the Settings (gear) icon in the main navigation bar of your HubSpot account.
  • Go to Marketing > Social
  • Click Connect account in the upper right.
  • Now just simply click on the following links to connect your social accounts:

Now that you've connected one or more social accounts to HubSpot, you'll be able to execute your social media marketing strategy with ease. You'll soon discover having everything within the same social dashboard will not only save you time but help you improve results, too.

The following will walk you through how to publish social posts, monitor all your social streams in one place, and create a custom posting schedule — all within your HubSpot social tool. Simply click on the links below to get started using HubSpot's social tool.

> Create and publish social media posts
Promote your blog articles, and landing page offers to increase traffic and garner the SEO benefits of an active social media practice.

> Monitor your social media streams in HubSpot
Effortlessly manage all your social media engagements in one place. Identify which content drives interactions, respond to social conversations, and gather important data about new followers.

> Create a custom social publishing schedule
Set up a custom posting time, a default publishing schedule, or create your own custom publishing schedule based on when engagement is anticipated to be the highest.

Once you've nailed the basics of using HubSpot's social tool, expand your expertise into some of these other areas as well:

hubspot-social-media


Digital Marketing Strategy

digital-marketing-campaign-strategyHubpost Makes it Easy to Develop Digital Campaigns

What if you could connect all your manufacturing digital marketing campaign initiatives into one central dashboard to monitor and track their performance? HubSpot is an integrated marketing software platform that lets you connect all your campaign pieces in one easy-to-use app.

From blog posts to landing pages, forms, emails, social media posts, and beyond, every one of your digitized campaign media can be tagged and monitored with HubSpot's campaign tool.

Get started with creating digital campaigns.

Digital marketing assets can be tagged using pixels from external ad networks or UTMs to track and gauge your overall campaign efforts' effectiveness. This Knowledge Base article will walk you through the steps for setting up the details of your campaigns:

  • Create a campaign in HubSpot.
  • Add budget and description information.
  • Add goals.
  • Add assets (blogs, landing pages, emails, etc.).
  • Tag each asset to the campaign.
  • Create tracking URLs/UTMs.

Once your digital campaign is created, you can perform the following in the Campaigns tool.

Enhance your digital marketing strategy with retargeting and Smart CTAs.

Retargeting (aka Remarketing) allows you to reshare information with website visitors when they arrive on retargeting platforms such as LinkedIn, Facebook, and Twitter. A small pixel (piece of JavaScript) code is placed in their browser and notifies the platform visited to serve specific content or ads based on the page(s) they viewed on your site.

For example, you may want to further educate site visitors with a site retargeting campaign on select social platforms or as they browse the web. Your goal is to deepen their understanding of your brand and offers on their journey to conversion — as a lead or a customer. You could set this up with a third-party platform such as Retargeter.

Here are links to incorporate retargeting with specific social media platforms:

Use Smart CTAs to serve dynamic content to different visitors based on the criteria you decide. Think of them as a tool to offer a deeper level of personalization to your target market. Smart CTAs will improve both your visitors’ website experience and your conversion rates. Check out these resources to better understand how to use Smart CTAs:

Customer Service Support with Service Hub

hubspot-tickets-for-manufacturingStay on top of service issues and support your customers with HubSpot’s Service Hub. In this section, we’ll explain what HubSpot’s Service Hub is, give an overview of its tools, and help get you started using tickets.

Support Exceptional Customer Service with The Hubspot Service Hub

Delighting your customers is not an option, it’s a requirement. Just as HubSpot’s Campaigns tool provides a central place to manage all your digital marketing initiatives, so does HubSpot’s Service Hub as it brings all of your customer service data and interactions together in one place.

Not only does Service Hub provide a central place for service support, but it also helps your team scale its support with automation and self-service. This is a critical factor for today's customers who expect 24/7 personalized service with problem resolution in minutes, not hours or days.

Here’s a quick overview of the free and premium collection of tools that make up Service Hub:

Free features:

  • Ticketing
  • Team email
  • Live chat
  • Email templates
  • Email and chat to ticket
  • Ticket creation bots
  • Meeting scheduling
  • Reporting
Premium features (available with Starter, Professional, and Enterprise editions):
  • Premium versions of all free tools, plus …
  • Customer service automation
  • Knowledge base
  • Customer feedback
  • Multiple ticket pipelines
  • Video creation
  • Custom support form fields
  • Goals
  • Over 30 additional features

Use Hubspot Tickets for Manufacturing Clients

Track and organize your customer's issues with HubSpot's ticket tool. Create tickets from a support query, phone call, email, or live chat. Once created, any follow on activity will be logged on the ticket record. Also, create individual tickets from your tickets home, a contact record, or your conversations inbox

Click the following links to learn and do key tasks with HubSpot Tickets:

HubSpot Analytics Support Manufacturing Metrics and Analytics

hubspot-ananlyics-dsahboardWe began this page by talking about how manufacturers can attract, convert, close, and delight customers while using HubSpot's integrated software tools suite.

But…

  • How do you know if you're achieving your goals?
  • Has traffic increased to your site, your blog?
  • Which lead source has the best conversion rate?
  • Also, while using Service Hub, how do you analyze the productivity of your service teams?

By now, it should come as no surprise that you can do all this and more with HubSpot’s analytical tools and report dashboards. This section will help get you started setting up and using all of the measurement and management tools you will need to monitor, analyze, and manage your key metrics and goals.

Monitor your key metrics.

HubSpot provides pre-named dashboard templates for monitoring Sales, Marketing, and Service key metrics. You can also choose to create a blank dashboard and give it a name of your choosing.

Once your pre-named or custom-named dashboard is created, you can set permissions for who can view and edit them. You can also add reports and further customize them to meet your needs.

Access these links to create dashboards and add reports:

Support your monthly goal setting with reports in your dashboards.

The dashboards and reports you create will measure the goals you've carved out for your manufacturing marketing, sales, and service objectives. You may also want to look into using HubSpot's analytical tools (some of which can be used to generate reports that can be added to the standard or custom dashboards):

Take the crawl, walk, run approach.

We've covered a lot of ground. Don't get overwhelmed by all of the reports, dashboards, and analytical tools at your disposal. Start with the pre-named dashboards for Sales, Marketing, and Service.

Bookmark this page and come back to it from time-to-time to expand your analytical acumen and practices. You can also drill down into related topics and content by clicking the links in the Knowledge Base. And know this too, performance results improve over time with your ongoing engagement and use of HubSpot tools.

See how other manufacturers have grown their business and benefited from using HubSpot.