

Running marketing campaigns typically involves several mediums and initiatives that cross between both the marketing, sales, and customer service departments.
Tracking all of this can be a daunting task if you don't have the right tools and processes in place. Fortunately, HubSpot Marketing Pro and Enterprise customers have access to HubSpot Campaigns to help tie all of your assets together.
Below, we break down how to create a campaign and how to track and associate all of your marketing assets used to support promotion and lead generation opportunities.
What is a Campaign in HubSpot?
Hubspot's Campaigns Tool provides an easy way to review and associate elements of your campaign all in one place, from the assets you create to the campaign analytics.
To get the most out of HubSpot Campaigns, we recommend using as many of the HubSpot tools in your HubSpot portal as possible.
For example, you might be sending your Email and building Landing pages in HubSpot, but publishing your social media posts in their native apps. With this approach, you won’t see your Social Posts showing up in the Campaigns section; instead, they will only show up as traffic under Social or by using UTM tracking codes. However, if you publish social posts directly in HubSpot and tag them to your campaign, you will see all of the posts in the campaign tool and the associated metrics.
Best Practice Tip: Before you create your HubSpot campaign, think about the naming conventions you currently use in HubSpot. Make sure you are going to name your campaigns in a consistent way so other users can identify campaigns. You want to think about this now before you create your campaign and start assigning assets.
How to Create a HubSpot campaign
Step 1: Create your campaign
- In your HubSpot account, navigate to Marketing > Planning and Strategy > Campaigns.
- In the upper right, click Create Campaign.
- In the dialog box, enter a Campaign name. This should be a unique campaign that other users in your HubSpot account will easily understand. Then, click Create.
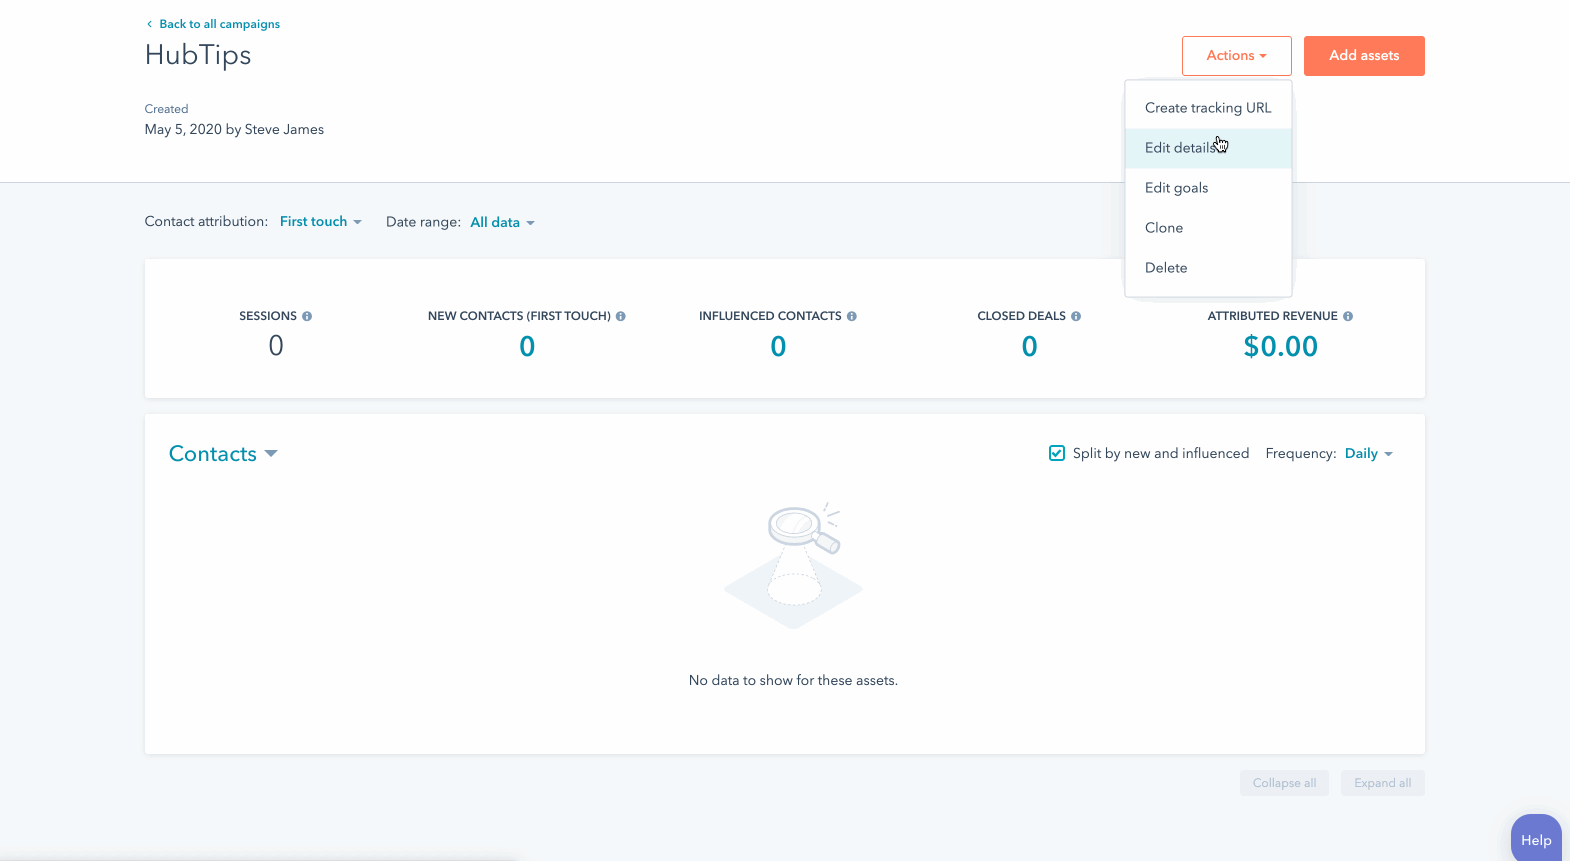
Step 2: Add budget and description to your HubSpot Campaign
- In the upper right, click the Actions dropdown menu and select Edit details.
- In the dialog box, enter a Budget and Notes, then click Save.
Step 3: Add goals to your HubSpot Campaign
- In the upper right, click the Actions dropdown menu and select Edit goals.
- In the dialog box, enter goal numbers for Sessions, New contacts, Influenced Contacts, Closed Deals, and Influenced Revenue.
- Click Save.
How to Add Assets and Content to Your HubSpot Campaign
Next, you can start adding existing marketing assets and content to the campaign (e.g., emails, blog posts, landing pages).
You can associate blog posts, calls-to-action, emails, landing pages, social posts, website pages, workflows, or static lists with a HubSpot campaign on the Campaign Details page or in most of the Content Tool settings.
Follow these steps to add assets:
- In the upper right, click Add assets.
- In the dialog box, select an asset type in the left sidebar menu to add to the campaign.
- Use the search bar to search for assets or content. Select the checkbox next to an asset or piece of content to add it to the campaign. When you're done, click Save.
Static lists from offline events can be associated with any campaign in your account. Any closed won deal that has one of the contacts associated will be included in your influenced deals and influenced revenue metrics. Each campaign can be associated with up to five static lists.
Best Practice Tip: Keep in mind -- static lists can be associated with a campaign from the campaign details page only. Active lists in HubSpot can't be associated with a campaign.
You’ll also want to remember adding assets or content that are already associated with another campaign to a new campaign will remove them from their current campaigns. Only workflows can be associated with multiple campaigns.
What’s the Difference Between a Campaign and Utm_campaign?
HubSpot campaigns are used to tag related marketing assets and content in HubSpot so you can easily measure the effectiveness of your collective marketing efforts.
utm_campaign tags are used to track traffic to your website. HubSpot campaigns may include traffic that is tagged with utm_campaign parameters, but not all utm_campaign parameters are necessarily related to a HubSpot campaign.
Best Practice Tip: We typically recommend setting up the campaign first before you begin building assets. Once tracking URLs for paid search campaigns and other sources are created, they cannot be associated with a HubSpot campaign.
One thing that can cause issues with future tracking with UTM urls is to make sure the UTM has exact spelling, no spaces, and no added characters if you decide to create other tracking URLs outside of HubSpot.
If the utm_campaign is changed at any point, the HubSpot campaign won't associate that traffic with the campaign anymore. In addition, the tracking is not retroactive, so if the HubSpot campaign was set up after the launch of the paid campaign, the traffic won't match up.
How to create tracking URLs for a HubSpot campaign
- In the upper right, click the Actions dropdown menu and select Create tracking URL.
- In the dialog box, enter a URL, select a UTM campaign, and a Source. You can also specify a UTM medium, UTM term, and UTM content.
- When you're done, click Create, or Create and add another to create another tracking URL for the campaign.
How to Review Your Campaign Dashboard Analytics

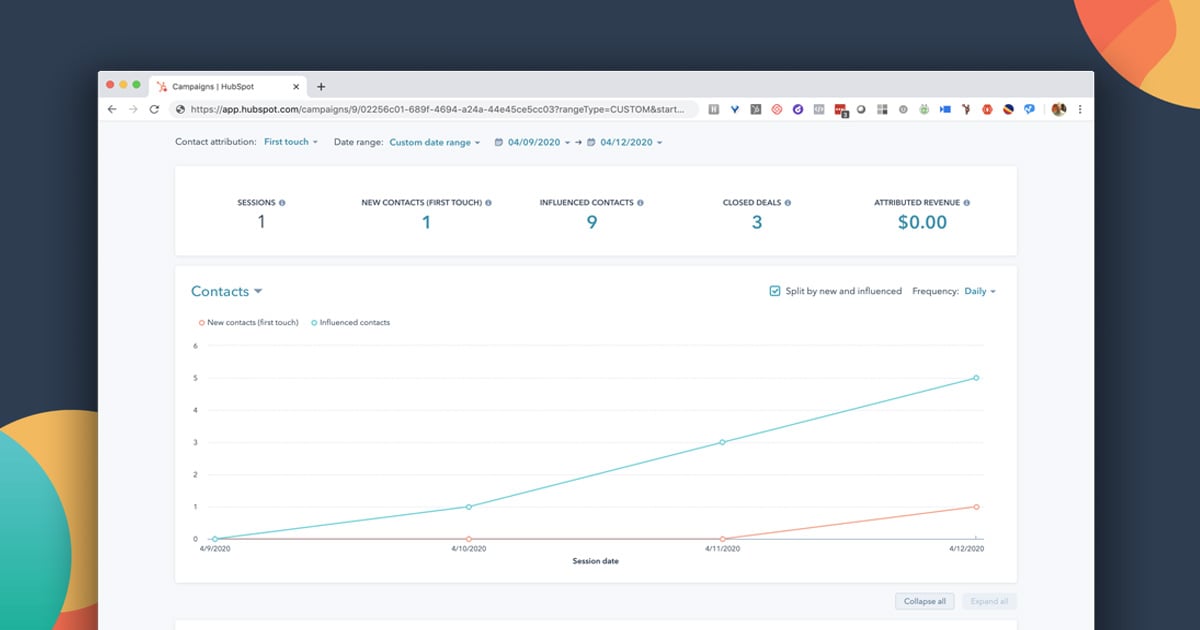
To view the performance of a single HubSpot campaign to measure its impact on contacts, deals, and traffic to your website, you will want to go back to the HubSpot campaign dashboard.
- In your HubSpot account, navigate to Marketing > Planning and Strategy > Campaigns.
- Click the name of the campaign you want to view or edit.
- In the upper left, you can filter your campaigns:
- Contact attribution: select if new contacts should be attributed to the campaign via First touch or Last touch.
- Date range: select a date range to analyze your campaign.
Best Practice Tip: The date range filter does not change how campaign data is collected. Data from campaign assets will only be included after the asset is associated with the campaign, even if the date range precedes it.
The first report shows an overview of the campaign's performance:
- Sessions: the number of sessions associated with the campaign.
- New contacts: new contacts based on the attribution model you selected associated with the campaign.
- Influenced contacts: contacts that engaged with one or more assets that are associated with the campaign. For example, they may have submitted a form to a page associated with the campaign.
- Closed deals: number of closed deals associated with new or influenced contacts that are associated with the campaign.
- Influenced revenue (Marketing Hub Professional only): the total amount from closed won deals that are or have been associated to contacts who have been influenced by the campaign.
- Attributed revenue (Marketing Hub Enterprise only): the amount from closed won deals attributed to the campaign using a linear attribution model. You can click the amount to view the individual interactions that are related to your campaign and the closed deal revenue attributed to each interaction.
- If there are campaign goals, they will appear under the respective performance metrics.
The second report shows a chart of the contacts or sessions attributed to the campaign. Hover over a data point in the report to view a breakdown of metrics.
- In the top left of the chart, click the dropdown menu and select to view contacts or sessions in the chart.
- In the top right of the chart, click the Frequency dropdown menu and select to view the report at a daily or monthly frequency.
- By default, contacts are split by new and influenced. To view only influenced contacts in the report, clear the Split by new and influenced checkbox.
- By default, sessions are split by source. To view total sessions in the report, clear the Split by source checkbox.
- The next section shows the performance of each asset or content type associated with the campaign. To collapse or expand all the asset or content type reports, click Collapse all or Expand all. You can also collapse or expand an individual report by clicking it.
- The metrics in each report vary depending on the asset or content type. To view more detailed performance information, click the name of an asset or piece of content.
The Traffic section shows traffic to URLs containing the UTM campaign parameter in terms of views, visitors, and new contacts, broken down by source.
- To view paid search traffic further broken down by search term, click Paid search.
- To view other campaign traffic further broken down by source and medium, click Other campaigns.
How to Analyze All Campaign Performance in the Campaign Analytics Tool
You can use the campaign analytics tool to measure the effectiveness of all the campaigns you've created in HubSpot.
- In your HubSpot account, navigate to Reports > Analytics Tools.
- Click Campaign Analytics.
- Use the Date range and Frequency dropdown menus to filter the data to a specific time range.
- This will filter the data in any tab you're in.
- A week in the report starts on Sunday by default, when the date range selected consists of a week, or when the frequency is set to Weekly.
Once you configure your chart and metrics the way you prefer you can also save the chart as a report in your reports list or export the report.
- On the right, click Save as report.
- In the dialog box, enter the Report name.
- To add the report to a dashboard, click the Add to dashboard dropdown menu and select if you want to add it to an existing dashboard or create a new custom dashboard.
- If you select Existing dashboard, click the Select existing dashboard dropdown menu and select the dashboard to add the report to.
- If you select New Custom dashboard, enter the Custom dashboard name and click the Visibility dropdown menu to select if the dashboard should be shared, shared but read only to others, or private to your own user.
- Click Save and add.
If you are a Marketing Hub Professional or Enterprise user you will see revenue attributed to your campaign in the top right of the dashboard next to your closed deals.
For Marketing Hub Professional only you will see Influenced revenue. This is the total revenue of closed won deals that are associated with influenced contacts. The total is from the sum of the Amount property of closed won deals. Only influenced deals will contribute to this total.
Marketing Hub Enterprise only will see Attributed revenue. This is the sum of the values in the Amount property from closed won deals attributed to the campaign using a linear attribution model.
Note that, by default, the attributed revenue metric in campaigns uses the linear attribution model. If you'd like to see how your campaign performed across different attribution models, you can do so in the custom report builder.
Getting Started with HubSpot’s Campaign Tools
In this article, you learned how to set up your HubSpot Campaign, add your marketing assets to the campaign, and how to report your results. These HubSpot campaign best practices will help your marketing team track, measure, and show ROI of your marketing initiatives.
The best advice? Dive in and get started and see the power of HubSpot’s campaign tools.
Do you need help implementing campaign tracking metrics or improving campaign performance? Reach out to our team for additional information, tips, and best practices.